Thursday, January 4, 2007

MOVED!

We have now moved to REAL web hosting. You can find new tweaks along with a new look at

http://boozkerstweaks.trap17.com


Please do not come here looking for new tweaks because this is my last post here.

Until you come visit the new site,

This is BooZker saying

Good luck and happy tweaking

Friday, December 8, 2006

Automatically Get Not Responding Programs to Shut Off

It's been awhile everyone, but here is my next tweak. This is something I think everyone will enjoy. I know I do. With a quick tweaking you can get programs that do not respond to shut off. Wouldn't that be nice? Not having to do Ctrl+Alt+Delete over and over again would be nice for everyone.

Step 1. Go to Start then click on Run

Step 2. In the text area type in regedit (This stands for Registry Editor.)

Step 3. Go to HKEY_CURRENT_USER and double click

Step 4. Then double click Control Panel

Step 5. After that single click on desktop

Step 6. Look for AutoEndTasks. It should be a REG_SZ. Set that to a value of 1 by double clicking on AutoEndTasks.


All done. Now you should not have to ever use task manager to close a non responsive program!

Good luck and happy tweaking!

-BooZker

Monday, December 4, 2006

Add Stuff to Your Right-Click 'Send To' Menu

Ever wanted to add a folder to your send to menu? Not all of us want to send stuff through an email all the time or zip the file. Sometimes you want to send your files or folders to another folder for burning or something later. This is how you do it.

1. First thing we need to do is turn on the viewing of hidden files and folders. If your system has this on already or you know how to do this just skip to number 2. Here is how you do it very simple:

* Open a folder, I use My Documents

* Go to Tools on the top of the folder

* In the pull down go to Folder Options

* When that opens go to View

* In Advanced settings go to 'Hidden files and folders' and change your settings to Show hidden files and folders. See Image below


* Click Apply and then click Apply to All Folders

Now your done with the first part. Go to 2.

---

2. Next you will need to go to Start > My Computer > C:\ > Documents and Settings > (your user name) > Sendto or C:\Documents and Settings\(User name)\SendTo

If you don't see it you might need to change the folder settings. See above in step 1.

Next all you have to do is put a shortcut to file or folder of what you want to add inside that folder. It should instantly update the right click send to menu. Test it out! If you don't know how to make a short cut see Below.

---

To create a shortcut or a file or folder just right click on the file or folder you want. In the right click menu go down to Create Shortcut. Now your all done. Just put that in the SendTo folder as in step 2.


Hope you guys like this! It's actually very handy. I added my Downloads folder to it, so when i download something with IE i can just save it to the desktop instead of having to go through all the folders to move it.

Good luck and happy tweaking!

- BooZker

Switch to Web Hosting. While You Wait...

Hey everyone. I see some people have been switching their shells around. Hope it's all been going well. I decided to make my own website so i don't have to have a blog. I find that, ya it's easier to post articles, but the design wise, it's a pain in the ass. So that is what i have been working on. Until I have it done here is a tweak that you can just download. Just go to this link:

http://www.chime.tv/products/glass2k.shtml

Vista has transparent windows and now you can too! Just go there download, unzip, install. All the instructions are there. You can use ctrl + shift + 0-9 and that will change the transparency. It's that easy.

Until i get the basic outline done on my website it might be sort of hit and miss for new material. Please hang on though because we have about 9 new tweaks coming soon. One which involves getting rid of those annoying help balloons that pop-up and one that automatically closes non responsive programs so you don't have to push control + alt + delete over and over again. You'll like them i promise!

- BooZker

Thursday, November 30, 2006

Changing your default icons for folders and files

We will be doing two things in this tutorial, changing the default folder icons and also changing the default icons for all of one file type. I'm pretty tired from having about 5 hours of sleep last night then going to school for 10 hours, so if I make a typo please tell me so i can fix it.

OK first you should download iColorFolder. This can be found at:

http://icolorfolder.sourceforge.net/

This program is awesome. It works great and they have some very pretty cool folder icons. Plus there are extras you can download if you still don't like any of them. Make sure to download 1.4.2 or the newest version. If you go to the Download section there is an "Additional Skin Pack" You should download this also.

Download, unzip, install. Now, if you did our previous tutorial, which was changing you PC's shell to a Vista shell, then there are Vista folder icons in here. It's perfect for changing it to Vista. No programming or anything.

Now pick your default icon set you want. In my case, Vista. Here is a screen show of what my computers My Documents looks like:


Pretty cool aye? There are more icons in case you get tired of these. If you downloaded the Skin Pack then just double click on it where ever you downloaded it and it should be just like a normal install screen. Just follow the instructions and you'll be done in seconds. Then all you have to is go to Start > All Programs > iColorFolder > Skin Selector and just pick one out.

The next part to this is pretty cool. Go to a random folder and right click then go to color label. By just clicking these you can color code you folders. This is similar to the Mac OS X. Click a color to code it by and voila!

---

For the next part it gets a tiny bit more technical. Nothing like changing the shell though. So lets say you want to change the icon for ALL of the .wmv files you have? Take a look at my finished videos for my site ojproductions.net:


I hate those ugly icons to say the least, so I will change them. Not one by one by one, but just follow these steps and all those icons will change along with every file after that with that extension.

First open a folder. It doesn't matter what one. I will use my documents.

*Open My Documents.

*Then in the tool bar above go to Tools.

*In the pull down menu go to Folder Options.

*Click on the File Types tab (this might take a second to load)

*Find the file type you want to change click on it once.

*Go to Advanced below.

*Go to change icons.

Here we will choose an icon. My icon is a black and white Windows Media Player icon. If you would like some icons here is one of my favorite sites:

http://www.vistaicons.com/

I chose the Crystal B&W icons. You will want to save these to a location where you will not move them. If you move them the files don't know what icon you want there and you will lose your icon. I put them in a folder located in C:\Windows\icons

OK back to where we left off. The icon I chose is inside the folder I just downloaded. If you downloaded the same one as me it's inside that folder in the ICO > Softwear > Divers > wmp.ico

Make sure to use ICO files. They will almost always have those files included.

Now click OK then close.

Here is my end result:


Hope you had some fun with this tutorial. Remember emails always welcome. Questions or comments I'm always open to emails.

Wednesday, November 29, 2006

Change your Windows shell to look like Vista

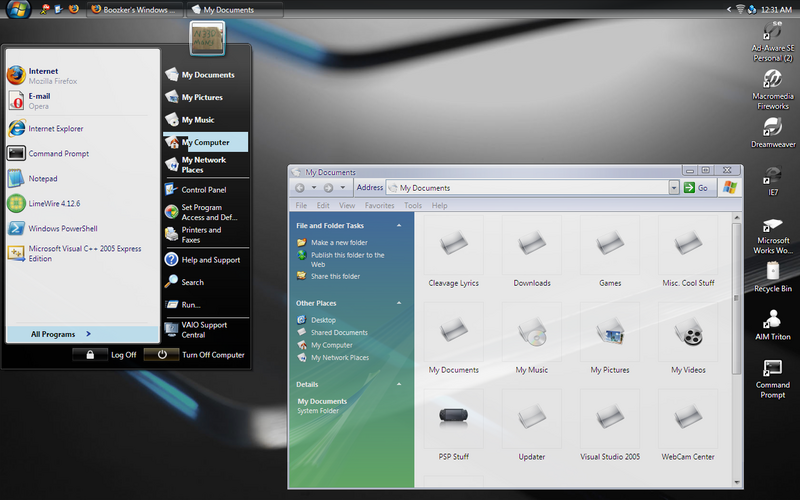
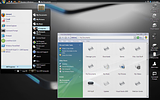
Want your PC to look like this?:


This tutorial will involve making your XP look like the new and upcoming Windows system, Vista. We will be changing the folders and other tweaks another day. Today however, we will be just switching the main shell and it comes with a boot screen. This is if you use the file I have provided if not, I have that covered to.

Before we start read the caution statement below:

CAUTION: Although I have never had any problems with changing the system setting such as the shell and boot screen, this does not mean it wont happen to YOU. Me, Trap 17, and the software creators claim no responsibility for system failures. If you ever have a system malfunction you can always try a Windows Recovery/System Restore, which will fix most problems.

OK time to start.

1. First thing is first. Make a folder in C:\Resources\Themes. If you do not know how to do this:

*Open My Computer
*Create Folder and name it Resources
*Open the newly created folder, Resources
*Create another new folder and name it Themes

2. Next you need to download a theme. The first theme is the one I chose and this tutorial will be following, but you can use ANY shell provided below as long as you follow the simple steps. I have provided you with the zipped folder of the Vista Transformation Pack 4 (VTP4).

*Go here http://rapidshare.de/files/20901878/vtp4.zip.html
*Download it into the C:\Resources\Themes folder.
*Then unzip it.

You will do this for every theme you download.

If you want to look at some others here is a link you can go to and take a look at some other shells. There are some amazing looking ones here:

http://browse.deviantart.com/customization/skins/windows/visualstyle/

Go there and click on a thumbnail you are interested in. Then if you like it click the download link on the left side of the screen. It looks like a computer monitor/TV screen.

3. After you download a theme and unzip into the Themes folder you will need 2 other things, but first find out what service pack you are running. To do this click start then right click on My Computer and click properties.Under the general tab there should be something that says or close to:

Windows Edition
Microsoft Windows XP
Media Center Edition
Version 2002
Service Pack 2


Download one of these and unzip them on your desktop.

If you have Service Pack 1: http://www.softpedia.com/get/Desktop-Enhancements/Themes/UXTHEMEDLL-Pack-DLL-for-SP1-included.shtml

If you have Service Pack 2: http://www.softpedia.com/get/Desktop-Enhancements/Themes/UXTheme-Patch-For-Windows-XP-SP2-Final.shtml

And then download this Replacer tool. I strongly Recommend the STABLE version: http://www3.telus.net/_/replacer/

After this is done downloading unzip it to the desktop. Make sure you read the "readme"
4. OK time to replace the uxtheme.dll Go to C:\WINDOWS\system32\ and find the uxtheme.dll file. It should be towards the bottom. Don't open it, just find it. Keep that window open and do the following:

*Double click on the replacer tool you unzipped

*It will ask for the OLD UXtheme.dll file. So, drag the uxtheme.dll file you just found in the system 32 folder, and DRAG the file into the Replacer tool and press ENTER.

*It will now ask for the NEW uxtheme.dll file. Open the other folder you just downloaded and unzipped for your Windows XP Service Pack 1 or 2 . There should be a uxteme.dll file inside. DRAG the file into the Replacer tool and press ENTER.

*It will ask to confirm this. Make sure you did it right and enter Y for yes or N for no and press ENTER.

All done with the hard part!

--

OK now to use that theme/shell you downloaded.

If you have not unzipped it yet do so now. If you are using the file I provided Go to A. If your using another file go to B.

A. So you picked the file I gave you? Great.

*Make sure the file is in the themes folder and open it

*Double Click on the Vista Transformation Pack 4.o icon.

*Just follow the instructions and when the computer boots back up it should be different with a different boot screen and login and everything!

*If you want to change the Vista theme right click on desktop > properties > appearances tab > Windows and Buttons. Just scroll through. There are 4 themes that come along with it.


B. So you picked a different one? No problem just follow the steps below:

*Make sure the file is in the themes folder and open it

*Inside of the folder, most of the time in the root of the folder, is a icon that looks like a paintbrush painting a Windows XP window. Double click it. That is a Windows Visual Style File.

*It should automatically open the Display Properties and then all you have to do it click Apply. If not right click on desktop > properties > appearances tab > Windows and and look for it.

If you want to know what to do with the other files that you don't know why they are there, email me. Email me at boozker@gmail.com

That's it all done! You have changed you shell/theme. Try out some different ones now and then. Tomorrow we will be showing you how to change the folders to look like Vista.

First Post Ever!

Well i would just like to welcome everyone to the to the opening of my site... well, blog. I am too lazy to write all the HTML and CSS for a website right now. Until then, if ever, this will be BooZker's Windows Tweaks. We will have simple and easy to follow tutorials on how to tweak your Windows System.

My site will not only have tutorials, but also links to programs that will tweak it. In these cases we will have instructions on how to use the programs and where to get them. Here are some things that we will go over in the next few weeks:

  • Changing the Windows Shell
  • Change the BOOT screen
  • Change the default folder icons
  • Make your windows transparent
And even more. Keep checking back.

Peace